

How to install new fonts
I've noticed that a lot of people don't know how to do this. So, I've decided to create a blog to show people how. It's really quite simple.
First we have to download a font, don't we? So, we go to DaFont.com or some spiffy free font site like that. To download the font we want we simple click on the Download link. It should be pretty simple to find.
Once we click that download button we are confronted with a box that looks like this:
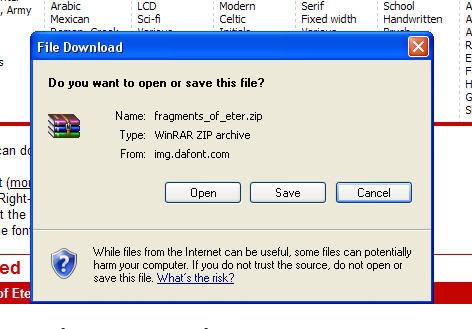
Oh no! What do we do? It's simple. Click either the Open or Save button. If you click Open, the font file is saved in a temporary folder of which is opened, allowing us to see the contents. If we click Save, the .zip file is saved to a location of your choice, ready to install at a later date. For the purpose of this exercise, we will click Open.
The font will download, and then the file will open. Now, the next screen will look different depending on if you have Winzip or not. Winzip is a program that allows you to unzip files. Anyway, if you don't have Winzip, the file will open into a window that looks like any other Microsoft window. I'll do each of these sections seperatly.
For people with Winzip
Once the file is opened you should see a screen that looks like this:
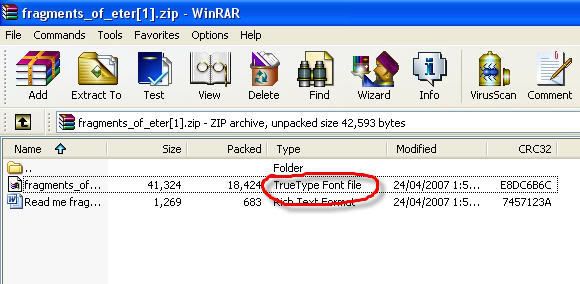
You select the file with an extension of .tff or similar. See above.
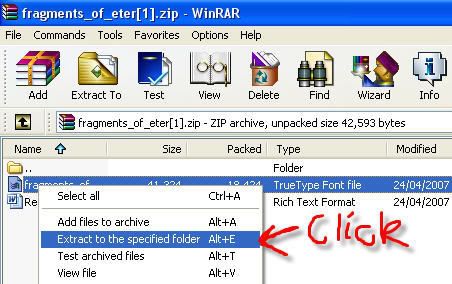
You then right click that file and click Extract to the specified folder
See below:
You should then see this screen:
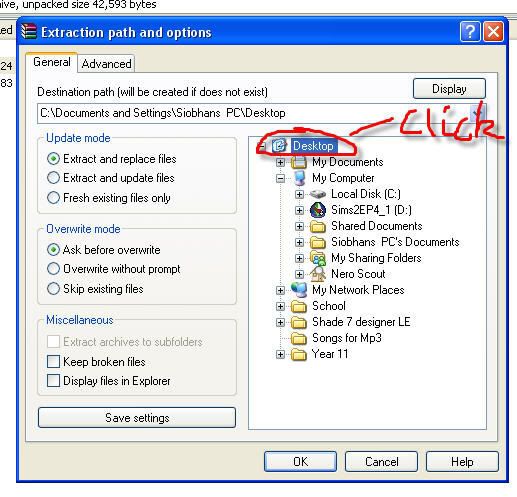
This is asking where you want to extract the file to. I usually extract them to the desktop, as they're easier to locate that way. So, for the purpose of this exercise, click on Desktop.
For Non-Winzip users
I don't actually have a diagram for this one. However, it's very simple. All you have to do once the file opens is look to your left. There should be something that says "Extract all files" or similar. Obviously, you click that. It should ask you where to extract them to. If so, choose desktop.
Installing
Yay! It's all downhill from here!
There are two ways of installing new fonts. I'm going to show you the easiest way, because the first method get a bit complicated at one point. This second method is much simpler and easier.
Firstly, open up your Fonts folder by clicking:
Start > Control Panel > Fonts
It's easy enough to find.
Next, we minimise all windows, so only the Fonts window is open and we can still see the desktop. Now all we do is click on the font file located on the desktop and drag it into the window. See below:
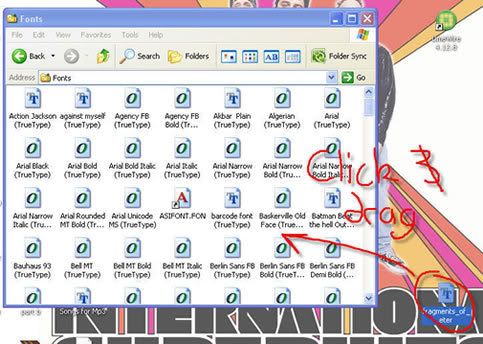
The font will then automatically install itself!
Congratulations! You're done! If you wish, you can delete the font file that's on your desktop. Don't worry, it won't get rid of your font. You've already installed it.
First we have to download a font, don't we? So, we go to DaFont.com or some spiffy free font site like that. To download the font we want we simple click on the Download link. It should be pretty simple to find.
Once we click that download button we are confronted with a box that looks like this:
Oh no! What do we do? It's simple. Click either the Open or Save button. If you click Open, the font file is saved in a temporary folder of which is opened, allowing us to see the contents. If we click Save, the .zip file is saved to a location of your choice, ready to install at a later date. For the purpose of this exercise, we will click Open.
The font will download, and then the file will open. Now, the next screen will look different depending on if you have Winzip or not. Winzip is a program that allows you to unzip files. Anyway, if you don't have Winzip, the file will open into a window that looks like any other Microsoft window. I'll do each of these sections seperatly.
For people with Winzip
Once the file is opened you should see a screen that looks like this:
You select the file with an extension of .tff or similar. See above.
You then right click that file and click Extract to the specified folder
See below:
You should then see this screen:
This is asking where you want to extract the file to. I usually extract them to the desktop, as they're easier to locate that way. So, for the purpose of this exercise, click on Desktop.
For Non-Winzip users
I don't actually have a diagram for this one. However, it's very simple. All you have to do once the file opens is look to your left. There should be something that says "Extract all files" or similar. Obviously, you click that. It should ask you where to extract them to. If so, choose desktop.
Installing
Yay! It's all downhill from here!
There are two ways of installing new fonts. I'm going to show you the easiest way, because the first method get a bit complicated at one point. This second method is much simpler and easier.
Firstly, open up your Fonts folder by clicking:
Start > Control Panel > Fonts
It's easy enough to find.
Next, we minimise all windows, so only the Fonts window is open and we can still see the desktop. Now all we do is click on the font file located on the desktop and drag it into the window. See below:
The font will then automatically install itself!
Congratulations! You're done! If you wish, you can delete the font file that's on your desktop. Don't worry, it won't get rid of your font. You've already installed it.


I tried and it just tells me I need to buy Winzip.
What then?
germma margaret!, August 9th, 2007 at 09:30:36am
Haha wow, I actually tried doing that. It worked :D Yay for your blog.
michelle danger., August 9th, 2007 at 04:36:00am
I spent like 20 seconds clicking on the 'cancel' thing on that screenshot at the top, thinking it was real I'm shocked at my own stupidity.
And very imformative, i shall seek this out when i wanna download a font.
Boo Radley, August 8th, 2007 at 07:08:47pm
i just extract them and copy and paste them into the fonts folder. : D
The Doctor., August 8th, 2007 at 05:47:17pm
Vonny, your step-by-step guides are simply amazing.
You sounds like my Dad with the whole computer intelligence :D
*gives you cookehs*
The Brightside., August 8th, 2007 at 11:02:53am
Yay you have LimeWire!
Miss Murder, August 8th, 2007 at 09:46:58am
awesome ^_^
Riot on the Radio, August 8th, 2007 at 08:58:06am
XD
vonny, August 8th, 2007 at 07:47:11am
Mines basically the same, but like, you have a different computer x]
Tholomew Plague, August 8th, 2007 at 07:41:55am
XD
There are other ways of installing fonts. This is the simplest method I think.
vonny, August 8th, 2007 at 07:39:50am
I Dont do mine like that. O_O
Kat taught me mine.
Took her 2 hours to give me all the screen shots, and for me to install my first font *proud*
VRY GOOD BLOG ^_^
Tholomew Plague, August 8th, 2007 at 07:30:38am